Introduction
Contents
This document describes the features of LibrePlan and provides user information on how to configure and use the application.
LibrePlan is an open-source web application for project planning. Its primary goal is to provide a comprehensive solution for company project management. For any specific information you may need about this software, please contact the development team at https://www.libreplan.dev/contact/
Company Overview
Company Overview and View Management
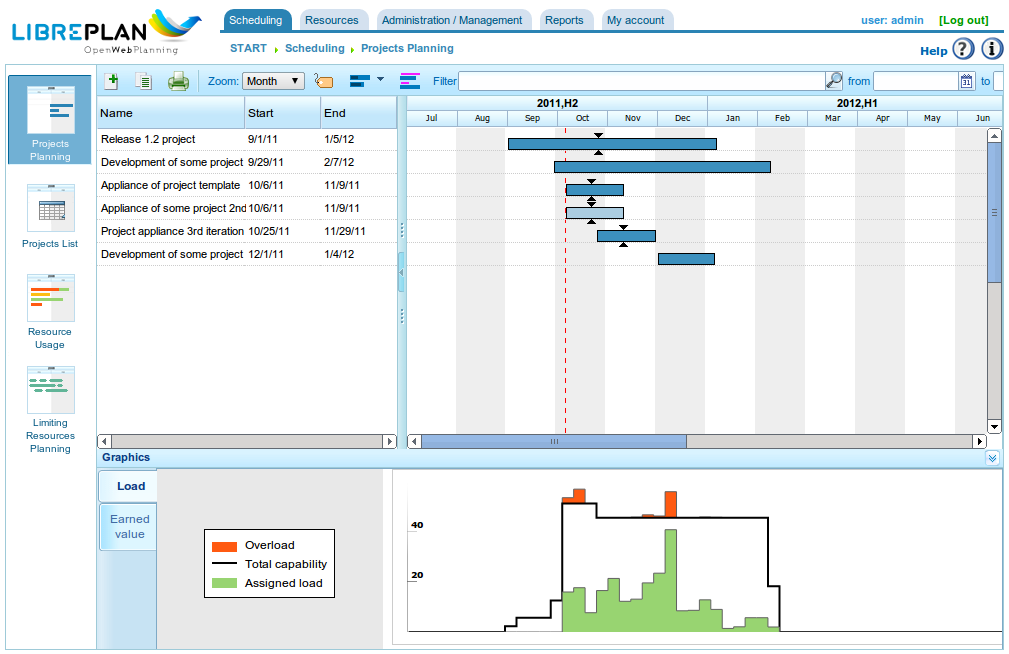
As shown in the program's main screen (see the previous screenshot) and the company overview, users can view a list of planned projects. This allows them to understand the company's overall status regarding projects and resource utilization. The company overview offers three distinct views:
Planning View: This view combines two perspectives:
- Project and Time Tracking: Each project is represented by a Gantt chart, indicating the project's start and end dates. This information is displayed alongside the agreed-upon deadline. A comparison is then made between the percentage of progress achieved and the actual time dedicated to each project. This provides a clear picture of the company's performance at any given time. This view is the program's default landing page.
- Company Resource Utilization Graph: This graph displays information on resource allocation across projects, providing a summary of the entire company's resource usage. Green indicates that resource allocation is below 100% of capacity. The black line represents the total available resource capacity. Yellow indicates that resource allocation exceeds 100%. It's possible to have under-allocation overall while simultaneously experiencing over-allocation for specific resources.
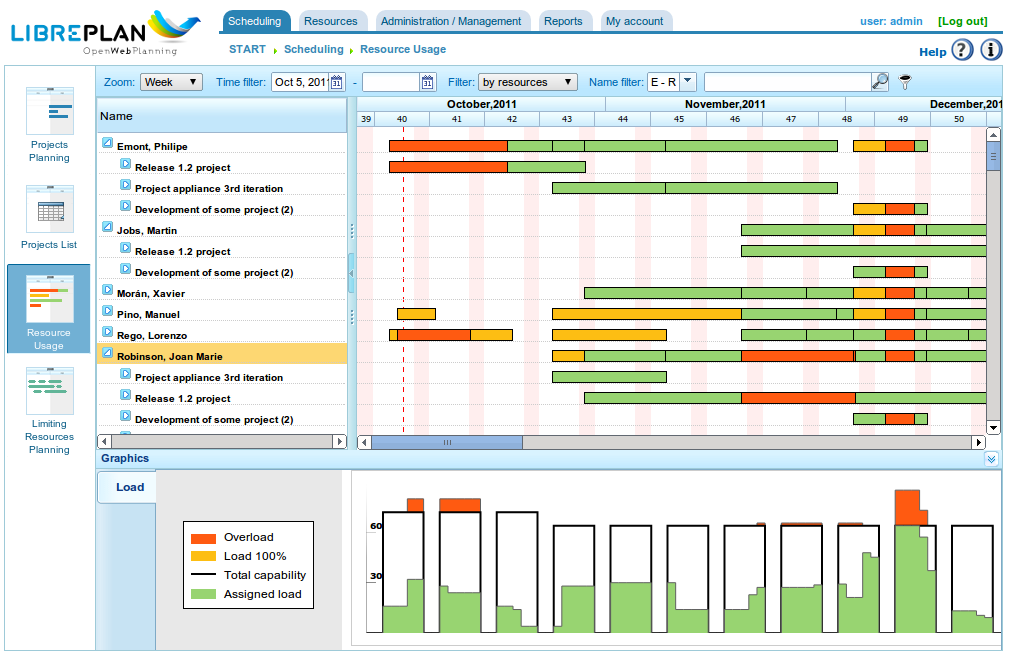
Resource Load View: This screen displays a list of the company's workers and their specific task allocations, or generic allocations based on defined criteria. To access this view, click on Overall load of resources. See the following image for an example.
Projects Administration View: This screen displays a list of company projects, allowing users to perform the following actions: filter, edit, delete, visualize planning, or create a new project. To access this view, click on Order list.
Resource Overview
Work Breakdown Structure
The view management described above for the company overview is very similar to the management available for a single project. A project can be accessed in several ways:
- Right-click on the Gantt chart for the project and select Plan.
- Access the project list and click on the Gantt diagram icon.
- Create a new project and change the current project view.
The program offers the following views for a project:
- Planning View: This view allows users to visualize task planning, dependencies, milestones, and more. See the Planning section for further details.
- Resource Load View: This view allows users to check the designated resource load for a project. The color code is consistent with the company overview: green for a load less than 100%, yellow for a load equal to 100%, and red for a load over 100%. The load may originate from a specific task or a set of criteria (generic allocation).
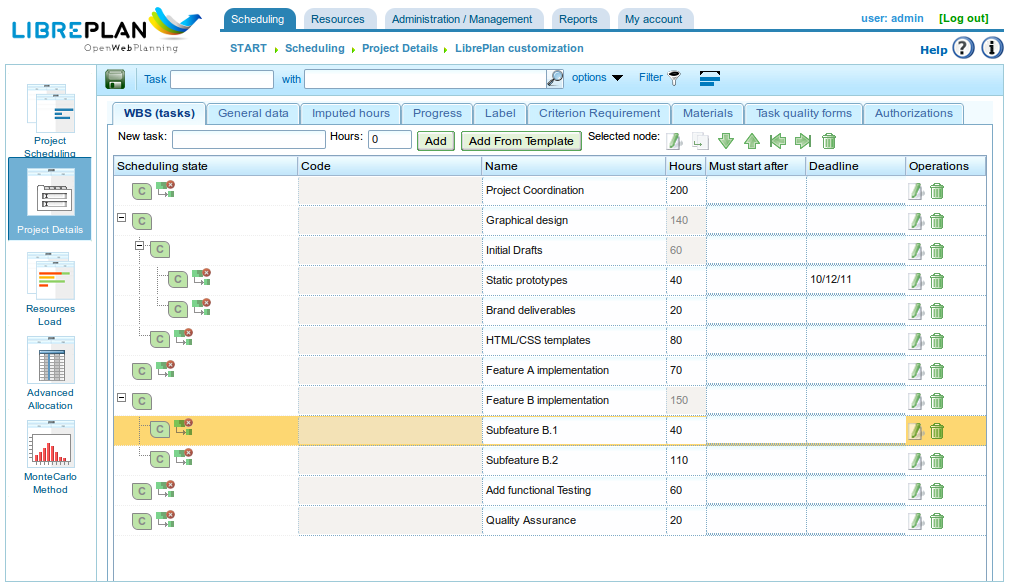
- Editing Project View: This view allows users to modify the details of the project. See the Projects section for more information.
- Advanced Resource Allocation View: This view allows users to allocate resources with advanced options, such as specifying hours per day or the allocated functions to be performed. See the Resource allocation section for more information.
What Makes LibrePlan Useful?
LibrePlan is a general-purpose planning tool developed to address challenges in industrial project planning that were not adequately covered by existing tools. The development of LibrePlan was also motivated by the desire to provide a free, open-source, and entirely web-based alternative to proprietary planning tools.
The core concepts underpinning the program are as follows:
- Company and Multi-Project Overview: LibrePlan is specifically designed to provide users with information about multiple projects being carried out within a company. Therefore, it is inherently a multi-project program. The program's focus is not limited to individual projects, although specific views for individual projects are also available.
- View Management: The company overview, or multi-project view, is accompanied by various views of the stored information. For example, the company overview allows users to view projects and compare their status, view the company's overall resource load, and manage projects. Users can also access the planning view, resource load view, advanced resource allocation view, and editing project view for individual projects.
- Criteria: Criteria are a system entity that enables the classification of both resources (human and machine) and tasks. Resources must meet certain criteria, and tasks require specific criteria to be fulfilled. This is one of the program's most important features, as criteria form the basis of generic allocation and address a significant challenge in the industry: the time-consuming nature of human resource management and the difficulty of long-term company load estimations.
- Resources: There are two types of resources: human and machine. Human resources are the company's workers, used for planning, monitoring, and controlling the company's workload. Machine resources, dependent on the people who operate them, function similarly to human resources.
- Resource Allocation: A key feature of the program is the ability to designate resources in two ways: specifically and generically. Generic allocation is based on the criteria required to complete a task and must be fulfilled by resources capable of meeting those criteria. To understand generic allocation, consider this example: John Smith is a welder. Typically, John Smith would be specifically assigned to a planned task. However, LibrePlan offers the option of selecting any welder within the company, without needing to specify that John Smith is the assigned person.
- Company Load Control: The program allows for easy control of the company's resource load. This control extends to both the mid-term and long-term, as current and future projects can be managed within the program. LibrePlan provides graphs that visually represent resource utilization.
- Labels: Labels are used to categorize project tasks. With these labels, users can group tasks by concept, allowing for later review as a group or after filtering.
- Filters: Because the system naturally includes elements that label or characterize tasks and resources, criteria filters or labels can be used. This is very useful for reviewing categorized information or generating specific reports based on criteria or labels.
- Calendars: Calendars define the available productive hours for different resources. Users can create general company calendars or define more specific calendars, allowing for the creation of calendars for individual resources and tasks.
- Projects and Project Elements: Work requested by clients is treated as a project within the application, structured into project elements. The project and its elements follow a hierarchical structure with x levels. This element tree forms the basis for work planning.
- Progress: The program can manage various types of progress. A project's progress can be measured as a percentage, in units, against the agreed budget, and more. The responsibility for determining which type of progress to use for comparison at higher project levels lies with the planning manager.
- Tasks: Tasks are the fundamental planning elements within the program. They are used to schedule work to be carried out. Key characteristics of tasks include: dependencies between tasks, and the potential requirement for specific criteria to be met before resources can be allocated.
- Work Reports: These reports, submitted by the company's workers, detail the hours worked and the tasks associated with those hours. This information allows the system to calculate the actual time taken to complete a task compared to the budgeted time. Progress can then be compared against the actual hours used.
In addition to the core functions, LibrePlan offers other features that distinguish it from similar programs:
- Integration with ERP: The program can directly import information from company ERP systems, including projects, human resources, work reports, and specific criteria.
- Version Management: The program can manage multiple planning versions, while still allowing users to review the information from each version.
- History Management: The program does not delete information; it only marks it as invalid. This allows users to review historical information using date filters.
Usability Conventions
Information About Forms
Before describing the various functions associated with the most important modules, we need to explain the general navigation and form behavior.
There are essentially three types of editing forms:
- Forms with a *Return* button: These forms are part of a larger context, and the changes made are stored in memory. The changes are only applied when the user explicitly saves all the details on the screen from which the form originated.
- Forms with *Save* and *Close* buttons: These forms allow for two actions. The first saves the changes and closes the current window. The second closes the window without saving any changes.
- Forms with *Save and continue*, *Save*, and *Close* buttons: These forms allow for three actions. The first saves the changes and keeps the current form open. The second saves the changes and closes the form. The third closes the window without saving any changes.
Standard Icons and Buttons
- Editing: In general, records in the program can be edited by clicking on an icon that looks like a pencil on a white notebook.
- Left Indent: These operations are generally used for elements within a tree structure that need to be moved to a deeper level. This is done by clicking on the icon that looks like a green arrow pointing to the right.
- Right Indent: These operations are generally used for elements within a tree structure that need to be moved to a higher level. This is done by clicking on the icon that looks like a green arrow pointing to the left.
- Deleting: Users can delete information by clicking on the trash can icon.
- Search: The magnifying glass icon indicates that the text field to its left is used for searching for elements.
Tabs
The program uses tabs to organize content editing and administration forms. This method is used to divide a comprehensive form into different sections, accessible by clicking on the tab names. The other tabs retain their current status. In all cases, the save and cancel options apply to all sub-forms within the different tabs.
Explicit Actions and Context Help
The program includes components that provide additional descriptions of elements when the mouse hovers over them for one second. The actions that the user can perform are indicated on the button labels, in the help texts associated with them, in the browsing menu options, and in the context menus that appear when right-clicking in the planner area. Furthermore, shortcuts are provided for the main operations, such as double-clicking on listed elements or using key events with the cursor and the Enter key to add elements when navigating through forms.